
Create GeoData entries
You can use GeoData to import existing metadata records or create a new metadata record using GeoData’s forms.
Import metadata records to NAL GeoData
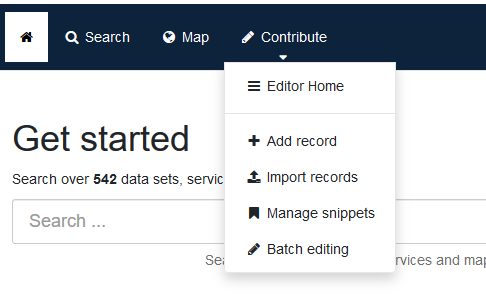
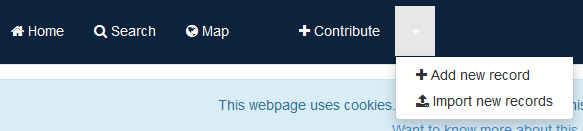
To import a metadata record into NAL GeoData, click on the +Contribute button in the top menu bar and choose Import new records,
or from the +Contribute page, choose the Import new records button from the menu bar on the right hand side of the display.
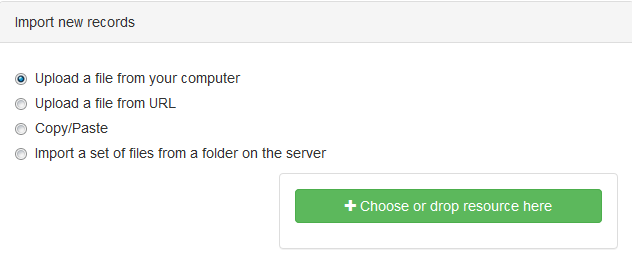
The Import new record screen appears, and you are now ready to prepare the files for ingest.
Work top to bottom, as the choices made at the top affect the choices allowed further down the import form.
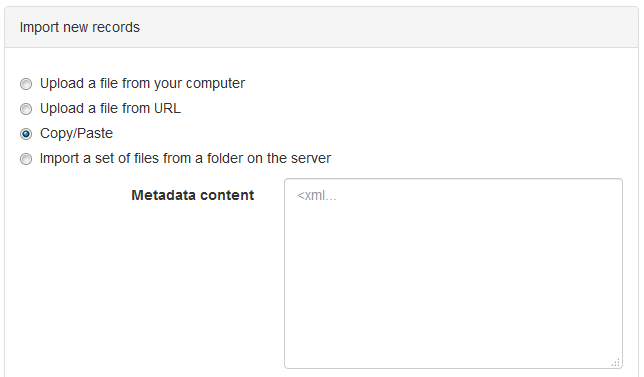
Users can choose to upload files from their computer, upload a file from a URL, copy and paste XML into the provided box, or import a set of files from a folder on the server.
Upload a file from a computer
This is the first choice on the import form, and allows for individual import of locally stored records.
Users can drag and drop a file, or navigate to its location on their hard drive using the +Choose or drop resource here button.
Note
Users can drag and drop multiple files to import in a batch.
Next, the user will choose the type of record to import. Metadata is the most common choice here, but users can also create templates with pre-populated fields that they or their group may use in the interest of time and increased accuracy. More information about creating these two types of resources is outlined in the “Creating templates” section below and the GeoData metadata keywords section.
If a record already has a UUID (Universally Unique Identifier) that should be preserved, choose Overwrite metadata with same UUID from the
Record identifier processing section.
The None or Generate UUID for inserted metadata choices will assign / overwrite a UUID for that record and generate a new UUID.
Most incoming metadata needs an XSLT conversion.
The most common choice is gmiTogmd, but users can choose whichever option is appropriate for the given data.
To validate the record upon import, check the Validate box, though this can be done after import as well.
Make sure Assign to current catalog is checked so the record is included in the main catalog.
A user’s choices for the Assign to group section are limited to those groups to which that user is currently allowed to contribute.
Choose the most appropriate group from this list.
Assign to category lets users choose the type of document they are uploading.
Most will fall under Datasets, but another choice may also be appropriate for the given data record.
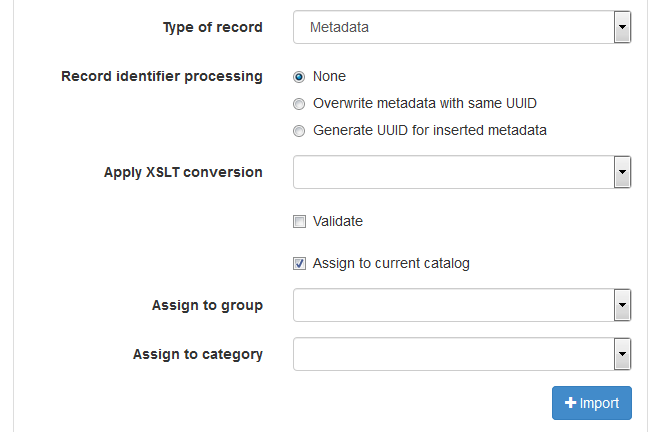
Once the form is filled out to completeness, click the +Import button.
Users will see a green progress bar in the upper right of the screen, followed by a success or error message.
If the message is successful, users may continue on to edit the record by clicking the link provided in the notice, or import more records.
Note that form choices remain filled out after the import is completed, so if users have multiple
records to upload it is fairly easy to upload them in succession to avoid having to fill out the form more than once.
If users receive an error message, review the form for discrepancies.
Try unchecking the validate button – if the record is not valid, users can work to correct the necessary fields after import.
Another common cause of import errors is choosing the wrong XSLT conversion.
If users continue to experience difficulty importing records, contact NAL-GeoData@ars.usda.gov for assistance.
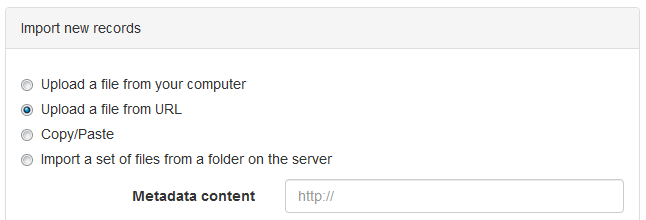
Upload a file from URL
This is the second choice on the import form, and allows users to upload a metadata file that is remotely hosted on the internet.
Paste the URL where the file is located into the Metadata content field.
Then choose the type of record to be linked. Metadata is the most common choice here, but users can also create templates or snippet entries.
The rest of the form is the same as in the previous section outlining how to upload a file from the user’s computer.
Copy/Paste
This is the third choice on the import form, and allows users to paste XML text into a Metadata content box rather than choose an existing file.
This choice may be handy if users want to edit a portion of the metadata prior to importing, but do not want to edit the original file.
XML should be properly formed in the correct standard or validation and import issues may result.
The rest of the form is the same as in the previous section outlining how to upload a file from the user’s computer.
Import a set of files from a folder on the server
This is the fourth and final choice on the import form, and allows users to upload an entire directory folder containing metadata records with the option to include subfolders. Metadata is the most common choice here, but users can also create templates. More information about creating these types of resources is outlined in the “Creating templates” section below.
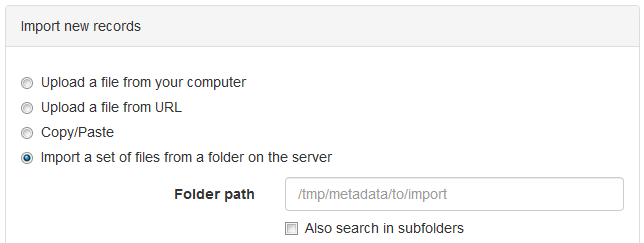
Note
This option is currently only available to NAL GeoData staff. If users have a large number of files to import, contact NAL-GeoData@ars.usda.gov for assistance.
The rest of the form is the same as in the previous section outlining how to upload a file from the user’s computer.
Write new metadata records in NAL GeoData
To create a metadata record from scratch directly in the NAL GeoData interface, click on the +Contribute
button in the top menu bar and choose +Add new record.
You can also choose +Add new record from the menu bar on the right hand side of the display of the +Contribute page.
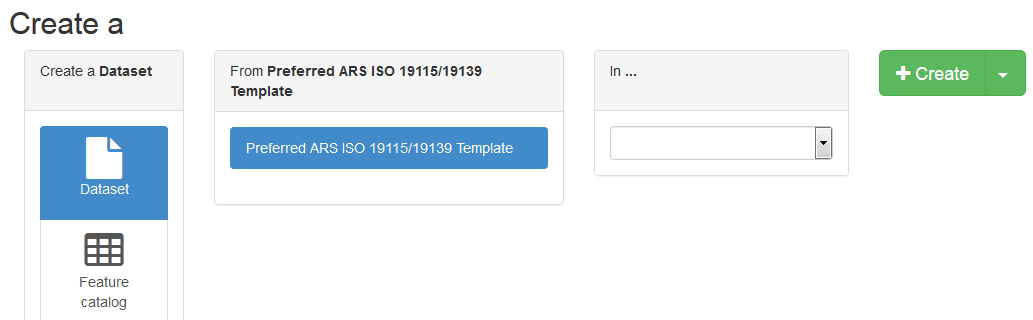
Once the +Add new record screen appears, work from left to right to make your core document choices.
You will be asked to choose the type of document you would like to create, and then choose a template to work from.
.. Annexes/iso_numbering.html#simple-summary-of-standard-numbers provides a summary of ISO metadata standard numbers.
Finally, add that record to a group from the drop-down list.
Only groups assigned to the logged-in user will show up in this drop-down list.
Create a new ISO 19115 record
Users can create ISO compliant metadata by using the provided templates in NAL GeoData portal.
In the first column, choose Dataset.
Then choose the desired template from the second column - the ARS ISO 19115/19139 Template is the preferred template for creating ISO 19115 compliant metadata from scratch.
However, users may create templates with pre-filled fields if certain aspects of their metadata will be the same across all their individual or group records.
See the next section for instructions on how to create a template in the NAL GeoData portal.
Add the new record to a group by choosing from the drop-down menu and then click the Create button.
The user will be taken to a blank template or pre-filled template that they may now edit and save.
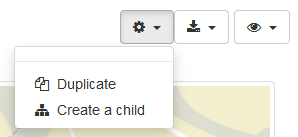
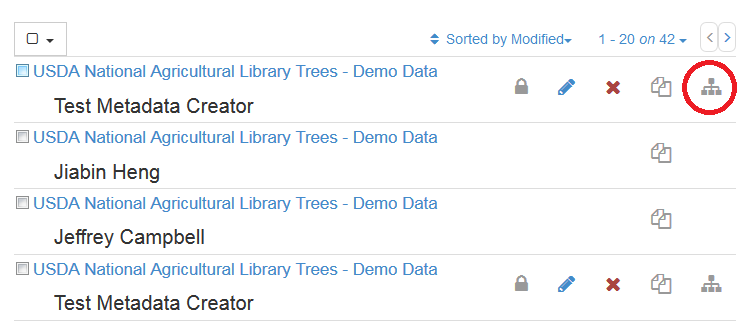
Users can also create a child record of an existing record by choosing create a child in the manage record button in the upper right of the
menu bar in an individual record page display, or by clicking the icon to the right of a record on the +Contribute page.
For a full list of sections in the ISO 19115 template, see the “Edit metadata records in NAL GeoData” section below.
Create a new feature catalog
In the first column of the Add new record page, choose Feature catalog. Then choose a template from the second column.
Add the new project to a group by choosing from the drop-down menu and then click the Create button.
Users will be taken to a blank template or pre-filled template that they may now edit and save.
Create a reusable snippet
Currently, only the NAL GeoData team may create reusable components due to open source system constraints. Please contact NAL-GeoData@ars.usda.gov if you would like to add or edit a reusable component.
Creating templates
Templates are metadata records that you can use as a starting point when describing a new resources. This section describe how to load and manage templates.
Creating and managing templates
Templates are managed similarly in the catalog as metadata records, but they have a special “template” tag.
They can be created, updated and removed in the +Contribute section.
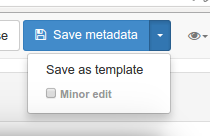
Metadata records can be converted to templates and vice versa at any time from the metadata editor using the save as template button.
Templates can be assigned to limited groups, so only these groups can use the template in their work process.
Populating your own templates
Each metadata standard provides default sample templates, but you should consider spending some times on building your own template in order to make editing task as easy as possible.
The type of template you create may depend on:
Resource type (e.g., template for paper maps)
Organizational strucutre (e.g., defining templates per services your organization offers)
Typical metadata usage for this type of resource (e.g., public use, internal use, data quality)
User community
In a template, you should try to:
Set as many default values as you can (e.g., define default contacts and keywords)
Create administrative and preservation elements that your encoding guideline recommends
Provide instructions for people who will be using the template (e.g., help text entered into the fields as placeholders)
The main goal is to guide editor work without requiring in-depth knowledge of the details of the chosen metadata standard.
Edit metadata records in NAL GeoData
Access the edit screen
Use the Edit button with the blue pencil tooltip in the upper right in the menu bar of the record display,
or to the right of the record title in the list display on the +Contribute page to edit the record.
General permission registered users may only edit records that they created or have been given permission to edit,
while group moderators may edit any record created by or assigned to their group.

Note
Concurrent editing is not a good practice and can result in lost changes. If a second user begins to edit a record while another user is already editing it, users will get a message stating Error while saving metadata. You should reload the editor. if they try to save.
Metadata editor menu bar
The menu bar that appears at the top of the metadata edit screen can offer tools and shortcuts for preparing, validating, and saving metadata records in the NAL GeoData portal.

Categories
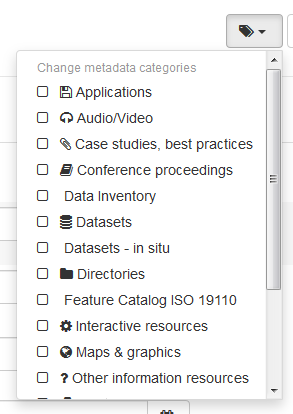
Categories are represented by the tag icon in the menu bar, which is the first visible icon on the left side. The drop down menu contains a variety of metadata categories, including Datasets, Feature Catalog ISO 19110, Interactive resources, Maps & graphics, and more. Choose the categories that best represent the data by checking the box next to each category to add. Multiple categories are allowed per record, so make sure everything checked is relevant to that record.
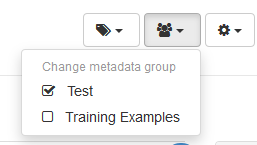
Groups
The metadata group choice is represented by the icon with people on it. Each registered user will be placed in the groups relevant to them, so some users will belong to one group while others may belong to multiple. Groups can be based on the location, job position, other criteria or groups might be permission-based by user role. Choose the group that best represents the data record by checking the box next to the group name. Users may only check one group per record.
Versioning
The Versioning button is represented by the gear icon in the menu bar.
Validate
The Validate button allows users to validate their record.
The existing record is analyzed against ISO standard and GeoNetwork specific schemas and will alert the user of any errors.
After clicking the Validate button, wait until the validation is finished to see results in the right hand column.
See the Metadata Submission Checklist for more information on how to interpret and fix errors.
Cancel
If users would like to exit the edit window without saving any of the changes made during this editing session, click the Cancel button in the menu bar to return to the main menu.
Save & close
The Save & close button will save all changes made to the dataset record and return the user to the main menu.
Save metadata
The Save metadata button is used during the editing session when checking validation repairs. Click the Save metadata button before re-running validation checks when attempting to fix validation errors.
Note
The Save metadata button will not save the metadata edits upon exiting the window – users must click the Save & close button to save any changes permanently.
Display
Users have the option to change their display mode to suit their editing needs. NAL GeoData edit interface has three viewing options, accessed through the Eye icon in the upper right of the screen. Three choices, Simple, Full, and XML are available. Simple is the default, while Full breaks sections out into tabs for more detailed information. The XML view allows advanced XML users to edit the XML directly in the edit window. These views are outlined in the ISO 19115 Metadata Elements Content section.